Okay, so this year hasn't exactly been one of consistency when it comes to Monster Crochet blog posts. I am attempting, however, to get back into a blogging routine of sorts. My life has changed so dramatically over the past 18 months that my life looks completely and totally different in it's current state from what it had been the last decade. There are a few things that have withstood the sea change such as my job at the cube farm, but even here, my position has expanded and my responsibilities have evolved (or devolved depending upon my outlook any given day). Anyway, my blog has suffered as a result of all the transition. Nonetheless, I am eternally appreciative for your patience as I walk through this period of change toward a bright new future and hopefully feeling the need to share it with you all via written medium.
On that note, I am not afraid of change. I dare say that I actually
like change. Love it even though it proves challenging. That being said, there are certain routines I have established in my life that provide me with some consistency, a familiar respite while undergoing the sometimes unsettling process of transition. For example, creating has always been both a place of discovery and solace for me. Making is an essential part of my day, a place to rest and recoup after a long day of negotiating the unfamiliar obstacles of my new path. Another routine I enjoy immensely is cooking. I find the process of creating with food all at once meditative, experimental, challenging and satisfying. So, although my work spaces and kitchens change, my mind and collateral tools are able to set up shop and get to work! Speaking of which...
Enough already with the introspective blather! Let's get on with the purpose of this post!
So, yes, experimentation abounds in the ChezLinoleum test kitchen right down to those dark, rich beans used to brew our morning cuppa joe. Yep, the special man friend and I roasted our own coffee beans and we didn't F it up either! Read on...
Step One
Procure some green beans. No, not the haricot vert variety! You want to obtain coffee beans that are ready for roasting, which happen to be a very delectable shade of army green. Basically, green coffee beans have had their outer skins removed and are then dried out. Only green beans are ready for the roasting process. Don't try to find a pick your own coffee farm! Anyway, one of my beloved's coworkers gifted him with a bag of bee-you-ti-ful Ethiopian green beans. So, loving a cooking challenge we began to do a bit of research on the intertubes to figure out how to help our green beans brown up.
Step Two
After procuring beans, it is time to determine your roasting platform. Your choices are to buy a spendy machine, plug it in and let it do the job for you (this is very much akin to a bread machine in my mind), haul your green buddies out to your next campsite and roast 'em over the campfire OR bulk up your biceps with a rather lengthy stove top stir-fest in your mom's cast iron skillet. What method did we choose? None of the above! Actually, we made up our own method after reading about all of three of these options on
this site.

My man and I happened upon this glorious piece of small appliance perfection (above) at our local Target and decided it met all of our coffee roasting requirements (cheap, able to keep beans in constant motion, allows us to maintain our weak biceps and as a bonus, it makes a darn good bowl of popcorn). Oh, and I like the fact that it's called Stir Crazy. Hey, I'm easily entertained...
Step Three Dump beans into the Stir Crazy and plug it in. Oh, if you do decide to do this at home, make sure to set your Stir Crazy under your stove top fan if possible, as an inevitable byproduct of coffee roasting is the smoke. Stove top fan kept the Linoleum test kitchen smoke-free!
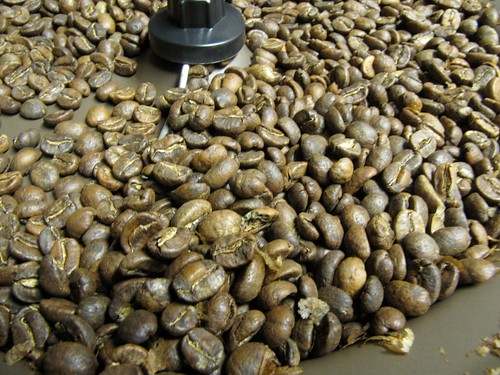
Watching coffee beans go in circles in the Stir Crazy is like watching waves break on shore. Okay, maybe not, but I know I was mesmerized!
Step FourWhen beans have browned up to desired color, cut the power to the Stir Crazy and move your beans to a colander. Grab a second colander and pour beans back and forth from one to the other until they've cooled. Store them in an airtight container and let them rest for 24 hours.
 Step Five
Grind some beans and drink up!

Neato right???
If you're ready to try this at home kids, take a look at
this site as they have lots of varieties of green beans and a more substantive set of directions. Have fun!