Showing posts with label Free Pattern. Show all posts

Tuesday, August 06, 2013

Crocheted Raffia Fedora - Free Pattern!

Everyone likes to sport a bit of fun atop their heads during the summer months, whether at the beach or just running errands about town. So, I figured I'd get my fingers working on a quick crochet that looks great under the summer sun...


Yes, that would be a lovely green fedora, crocheted from raffia ribbon, with a stylish white daisy adhered to its side. Literally peeps, I made this hat in one evening. That being said, I need to make another one in navy, one in natural and oh, maybe one in a lovely shade of coral. Ooooh, and one in turquoise! The raffia color selection is vast...Must. Take. Advantage.

You too can take advantage and make your own pile o'fedoras. Just download ye olde pattern link here. Happy summer crocheting kids!

Love,
LadyLinoleum


Crocheted Fedora

Monday, October 13, 2008

FREE PATTERN - Vampire Bat Applique

Are you all ready for this year's FREE Monster Crochet Halloween pattern???

Drumroll please!

Okay, forget the drumroll. Just keep reading.

Introducing the Vampire Bat Applique!
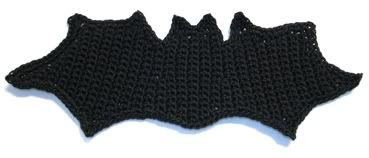

Bat made with black thread.

Materials:

~ Thread Bats~
DMC Pearl Cotton, size 8 - one ball will produce legions of bats
US size 6 steel hook
Tapestry or embroidery needle for sewing bats onto desired surface

~Worsted Weight Bats~
Worsted weight yarn of your choice - one skein or hank will produce legions of bats
US size F or G hook depending upon whether your yarn is a light or heavy worsted (aim for a dense fabric)
Tapestry or embroidery needle for sewing bats onto desired surface

Gauge:
These little batty bats can be crocheted in thread or yarn depending upon finished desired bat size. Little thread bats run about 4 1/2" from wing tip to wing tip, while their worsted weight yarn counterparts measure approximately 11 1/2" from tip to tip.

Abbreviations:
beg - beginning
ch - chain stitch
R - Row
rnd - round
sc - single crochet
sl st - slip stitch
st - stitch
sts - sts
tog - together

Directions:
Bat is worked from wing to wing utilizing short rows for shaping. Short rows are intended to be just that, rows made up of less stitches than the rows preceding. So, if I am directing to you work fewer stitches than the preceding row, I haven't lost my mind. Just follow the directions as written and your bat will thank you upon completion.
R 1 - ch 16, beg in second ch from hook work 5 sc into foundation ch, do not work remaining sts, turn.
R 2 - ch 1, 3 sc, turn.
R 3 - ch 1, sc first 2 sts tog, 4 sc, turn.
R 4 - ch 1, 5 sc, turn.
R 5 - ch 1, 8 sc, turn.
R 6 - ch 1, 7 sc, 2 sc in last st, turn.
R 7 - ch 1, 13 sc, turn.
R 8 - ch 1, sc first 2 sts tog, 10 sc, 2 sc in last st, turn.
R 9 - ch 1, 13 sc, turn.
R 10 - ch 1, 2 sc in first st, 11 sc, 2 sc in last st, turn.
R 11 - ch 1, 2 sc in first st, 14 sc, turn.
R 12 - ch 1, 16 sc, ch 3, turn.
R 13 - beg in second ch from hook 2 sc along ch sts, 16 sc, turn.
R 14 - ch 1, 17 sc, turn.
R 15 - ch 1, sc first 2 sts tog, 15 sc, ch 3, turn.
R 16 - beg in second ch from hook 2 sc along ch sts, 14 sc, sc last 2 sts tog, turn.
R 17 - ch 1, sc first 2 sts tog, 14 sc, turn.
R 18 - ch 1, sc first 2 sts tog, 13 sc, turn.
R 19 - ch 1, sc first 2 sts tog, 10 sc, sc last 2 sts tog, turn.
R 20 - ch 1, sc first 2 sts tog, 10 sc, turn.
R 21 - ch 1, 9 sc, sc last 2 sts tog, turn.
R 22 - ch 1, 10 sc, turn.
Rs 23 & 24 - ch 1, 5 sc, turn.
R 25 - ch 1, 2 sc in first st, 9 sc, ch 4, turn.
R 26 - beg in second ch from hook 3 sc along ch sts, 11 sc, turn.
R 27 - ch 1, 2 sc in first st, 13 sc, ch 3, turn.
R 28 - beg in second ch from hook 2 sc along ch sts, 15 sc, turn.
R 29 - ch 1, 2 sc in first st, 14 sc, turn.
R 30 - ch 1, 16 sc, turn.
R 31 - ch 1, sc first 2 sts tog, 14 sc, ch 3, turn.
R 32 - beg in second ch from hook 2 sc along ch sts, 15 sc, turn.
R 33 - ch 1, sc first 2 sts tog, 13 sc, turn.
R 34 - ch 1, 12 sc, sc 2 sts tog, turn.
Rs 35 & 36 - ch 1, 5 sc, turn.
Rs 37 & 38 - ch 1, 10 sc, turn.
R 39 - ch 1, 9 sc, 2 sc in last st, turn.
R 40 - ch 1, 2 sc in first st, 9 sc, 2 sc in last st, turn.
R 41 - ch 1, 12 sc, 2 sc last st, ch 3, turn.
R 42 - beg in second ch from hook 2 sc along ch sts, 13 sc, 2 sc in last st, turn.
R 43 - ch 1, 2 sc in first st, 14 sc, turn.
R 44 - ch 1, sc first 2 sts tog, 14 sc, ch 3, turn.
R 45 - beg in second ch from hook 2 sc along ch sts, 13 sc, sc last 2 sts tog, turn.
Rs 46 & 47 - ch 1, 14 sc, turn.
R 48 - ch 1, 2 sc in first st, 11 sc, sc last 2 sts tog, turn.
R 49 - ch 1, sc first 2 sts tog, 12 sc, turn.
R 50 - ch 1, 11 sc, sc last 2 sts tog, turn.
Rs 51 & 52 - ch 1, 12 sc, turn.
R 53 - ch 1, 8 sc, turn.
R 54 - ch 1, sc first 2 sts tog, 6 sc, turn.
R 55 - ch 1, 4 sc, turn.
R 56 - ch 1, sc first 2 sts tog, 2 sc, ch 3, turn.
R 57 - beg in second ch from hook 2 sc along ch sts, 1 sc, sc 2 sts tog.
Fasten off.

Bat Border Directions:
To finish bat, work 1 rnd of sc around entire edge. To keep the points around outer edge, uh, pointy while working border rnd, make 1 sc, ch 2, 1 sc at tip of each point. To end border rnd, sl st to beg sc to join. Fasten off with enough thread/yarn to sew bat onto desired surface.
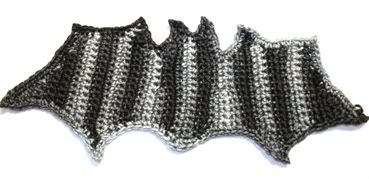

Bat made with variegated grey thread.

Happy Halloween everyone!!

Copyright 2008 Regina Rioux Gonzalez. All rights reserved.

Monday, August 04, 2008

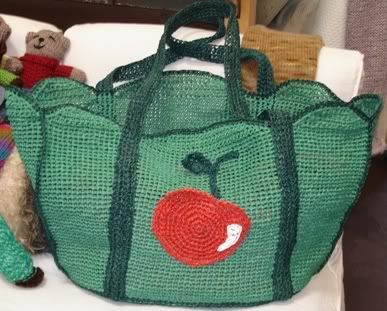
Cherry Ribbon Tote


When designing for publication, I am required to provide the pattern as well as the finished object to my editor. Rarely, if ever, do I receive the FO back from them. I get it. They’ve paid me and therefore, they own it. However, sometimes I wish I could have some of these creations for myself.

Case in point…The Apple Ribbon Tote featured in the book, Bag Style. I was so sorry to send this one off to Interweave. I really wanted the bag for myself.

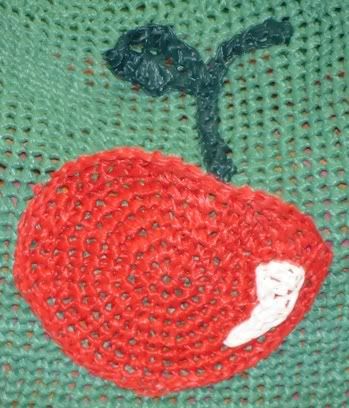
Well, I had no choice. I had to make another one! My newest version of this tote has a cherry pocket instead of the apple pocket seen in the book. I have lots of apparel and accessories in my closet adorned with cherries so this is the perfect mid-summer accessory for me!

It’s cute, no?

Maybe you’d like a Cherry Ribbon Tote too? I concur. Pocket pattern is below. Enjoy!

Original Apple Ribbon Tote pattern is found in Bag Style. Wraffia ribbon can be purchased from Paper Mart.


Cherry Pocket Pattern for Apple Ribbon Tote in Bag Style

Materials:
Main Color ("MC") – 1 spool, Red Wraffia Ribbon (1/4" x 100 yds) color no. 4434830
Highlight ("HC") – 1 spool, White Wraffia Ribbon (1/4" x 100 yds), color no. 4434810
Stem & Leaf Color ("SLC") – 1 spool, Forest Green Wraffia Ribbon (1/4" x 100 yds) color no. 4434865
US I hook
Tapestry Needle

Abbreviations:
ch – chain
dc – double crochet
hdc – half double crochet
Rnd – round
R – row
RS – right side
sc – single crochet
sl st – slip stitch
st – stitch
sts – stitches

Gauge:
13 sts x 15 rows = 4"

Directions:

~ Cherry Pocket ~
Cherry Pocket is mostly worked in the round. Each round begins with ch 1 and ends with sl st in first sc of round to join. Short rows are used for fine shaping of cherry.
Rnd 1/Foundation Rnd (MC) – ch 2, 8 sc in second ch from hook, sl st to first sc to join rnd.
Rnd 2 – ch 1, 2 sc in every st, sl st to first sc to join rnd. (16 sts total)
Rnd 3 – ch 1, (1 sc, 2 sc in next st) 8 times, sl st to first sc to join rnd. (24 sts total)
Rnd 4 – ch 1, (2 sc, 2 sc in next st) 8 times, sl st to first sc to join rnd. (32 sts total)
Rnd 5 – ch 1, 32 sc, sl st to first sc to join rnd.
Rnd 6 – ch 1, (3 sc, 2 sc in next st) 8 times, sl st to first sc to join rnd. (40 sts total)
End working in round. Begin short rows.
R 7 – ch 1, 13 sc, turn.
R 8 – ch 1, 11 sc, turn.
R 9 – ch 1, 34 sc, turn.
R 10 – ch 1, 7 sc, turn.
R 11 – ch 1, 9 sc, turn.
R 12 – ch 1, 6 sc, turn.
End short rows. Begin working in round.
Rnd 13 – ch 1, (4 sc, 2 sc in next st) 8 times, sl st to first sc to join rnd. (48 sts total)
Fasten off. This is the RS of your pocket.

~ Highlight ~
R 1 (HC) – ch 9, 1 dc in 3rd ch from hook, 1 dc in next st, 1 hdc in each of the next two sts, 1 sc in each of the next two sts, 1 sl st. Fasten off with enough ribbon to sew to cherry pocket.

~ Stem ~
R 1 (SLC) – ch 16, 1 hdc in second ch from hook, 1 hdc in next st, 1 sc in each of the next two sts, 1 sl st in each of the next 11 sts. Fasten off with enough ribbon to sew to front of bag.

~ Leaf ~
Leaf is worked in the round.
Rnd 1 – ch 8, 1 sc in second ch from hook, 1 hdc in each of the next two sts, 2 dc in next st, 1 hdc in each of the next two sts, 1 sc in last st, ch 2 and rotate work right, working in the bottom of the foundation ch make 1 sc in first st, 1 hdc in each of the next two sts, 2 dc in next st, 1 hdc in each of the next two sts, 1 sc in last st, sl st to beg sc to join rnd. Fasten off with enough ribbon to sew to front of bag.

Finishing:
Weave in ends. Sew highlight to front of cherry motif. Sew cherry motif to front of bag making sure that you are placing your sts along the sides and bottom edges of the motif, but not along the top, thereby creating a pocket. Sew leaf and stem to front of bag above cherry pocket.

Copyright 2008 Regina Rioux Gonzalez. All rights reserved.

Wednesday, March 26, 2008

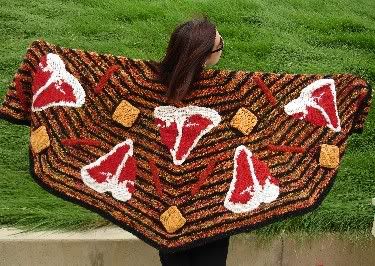
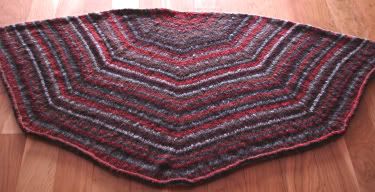
Free Pattern - Knit Half Round Shawl

I use this pattern again and again. It's easy and there is no end to the different color combinations, stitch patterns and embellishments one can apply to this versatile accessory.

For instance, I've adorned this half circle with grilled delights...


And simple stripes...


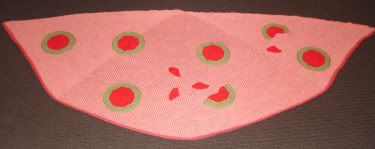
Olives and pimentos...


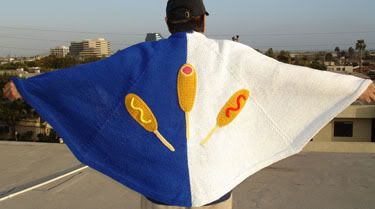
Corndogs...


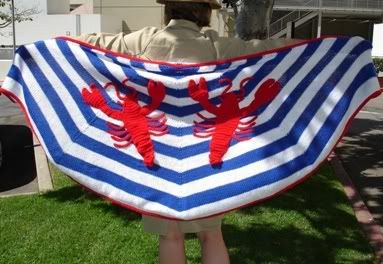
As well as these crazy crustaceans...


Despite the examples above, I feel as if I've only begun my exploration about the realm of the half-round. Oh yes, more iterations definitely to come.

Love to see your take on this one too...

Come on, give it a try!

Materials
  • 800 yards (give or take) of worsted weight yarn
  • US size 8, 9 or 10 circular needle (40")

Abbreviations
  • BO - bind off
  • CO - cast on
  • K - knit
  • KF&B - knit in front and back of stitch
  • P - purl
  • PF&B - purl in front and back of stitch
  • PM - place marker
  • st/sts - stitch/stitches

Directions
Shawl is worked from top down.
CO 8 sts.
R 1 - K 2, PM, K 2, PM, K 2, PM, K 2.
R 2 - PF&B of every st.
R 3 - K
R 4 - P
R 5 - KF&B first and last sts and before and after each marker. (two increases made per "section").
R 6 - P
R 7 - K
R 8 - P
Repeat rows 5 - 8 until desired length is achieved. (I usually work until I have at least 320 stitches on the needles.)
BO.

It just doesn't get much easier than that!

Copyright 2008 Regina Rioux Gonzalez. All rights reserved.

Tuesday, January 01, 2008

New Year Chrysanthemums

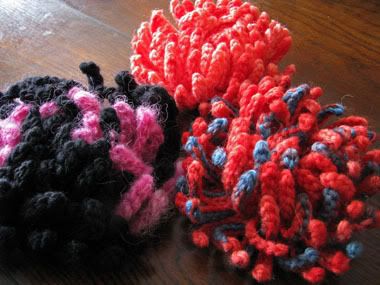
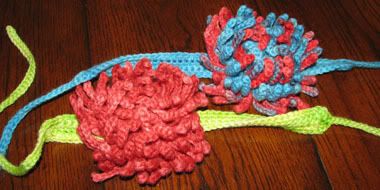
After finishing my December magazine projects I felt the need to work up a few quick items before beginning anything long and drawn out. Therefore, I give you the New Year Chrysanthemum(s)!


These versatile fuzzy flowers can be used as pins, as adornments for your favorite hats or even as an ornament on a chocker!


You'll definitely turn heads with the big ole flower strapped to your neck!

So, why don't you make one? Or two? The free pattern is below. Happy New Year everyone!

Chrysanthemum Pattern

Materials
  • Any worsted weight yarn will give you a nice size fleur. I used some of my own hand dyed stash. Go Kool-Aid!
  • US G hook
  • Tapestry needle
  • Pinbacks (optional)

Abbreviations
ch - chain stitch
dc - double crochet
PM - place marker
r - row
rnd - round
sc - single crochet
sl st - slip stitch
st/sts - stitch/stitches

Directions

Base
Rnd 1 - ch 2, 8 sc in second ch from hook. PM in first sc. Marker will move up as each rnd is completed to denote beginning of rnd.
Rnd 2 - working in back loops only 2 sc in every st.
Rnd 3 - working in back loops only (1 sc, 2 sc in next st) 8 times.
Rnd 3 - working in back loops only (2 sc, 2 sc in next st) 8 times, sl st to back loop of beg sc, fasten off.

Florets
Florets are worked in one continuous spiral in the available front loops on base. Beginning at the center of the base attach in the first front loop available.
Rnd 1 - (1 sc, ch 9, 1 sl st in second ch from hook, 7 sl st in remaining chains) repeat in each subsequent front loop on base. Fasten off.

Chrysanthemum Finishing
Weave in any remaining ends. If desired, sew pinback to back of flower.

Chocker
Foundation chain - ch 43.
R 1 - 1 sc in second ch from hook, 41 sc in remaining chains, turn.
R 2 - ch 1, 42 sc, turn.
Rnd 3 - ch 1, 42 sc, ch 1, rotate work right, make 2 dc in the middle (same space) of short side, ch 51, 1 sl st in second ch from hook, 49 sl st in remaining chains, 2 dc in same space as first 2 dc, ch 1, rotate work right and work 42 sc along foundation ch, ch 1, make 2 dc in the middle (same space) of short side, ch 51, 1 sl st in second ch from hook, 49 sl st in remaining chains, 2 dc in same space as first 2 dc, ch 1, sl st to first sc to join rnd. Fasten off.

Chocker Finishing
Weave in any remaining ends. Sew Chrysanthemum to chocker.

Copyright 2008 Regina Rioux Gonzalez. All rights reserved.